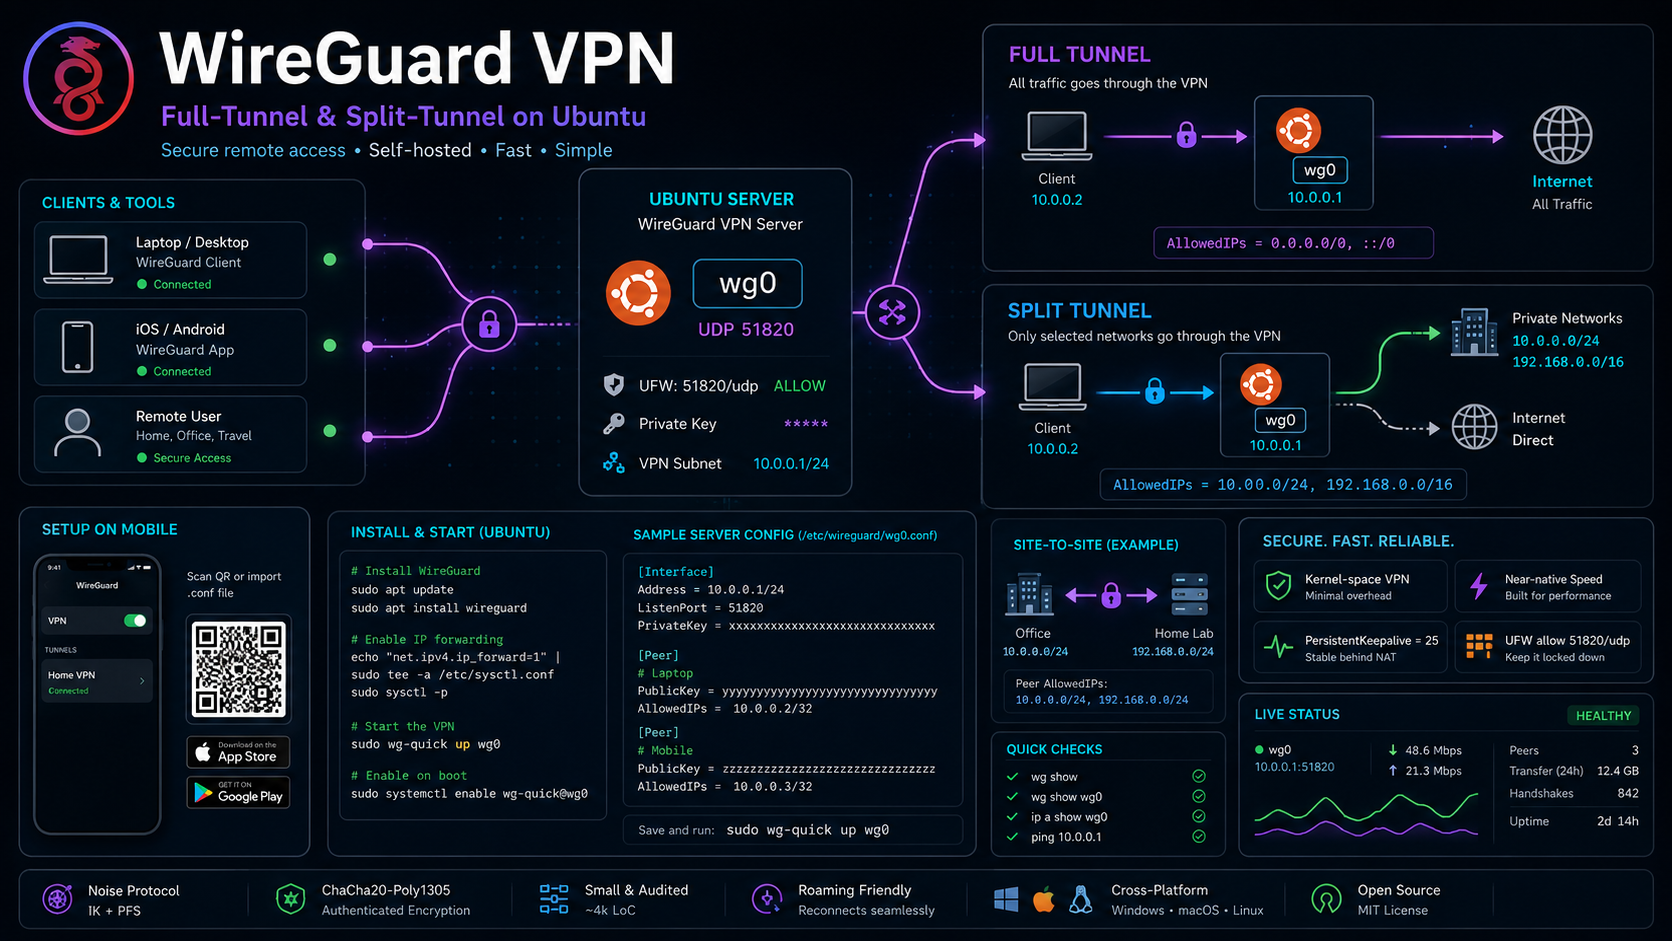
WireGuard VPN — Full-Tunnel and Split-Tunnel on Ubuntu
Commercial VPNs encrypt your traffic to a server you don't control, in a country you didn't choose, with logging policies you can't verify. A self-hosted WireGuard VPN puts you in control — your server, your keys, your rules.
I run WireGuard on Ubuntu for two things: full-tunnel mode when I'm on public Wi-Fi (all traffic routes through my home server), and split-tunnel mode for accessing homelab services remotely (only internal traffic routes through the VPN). Setup takes 15 minutes and the performance is near-native — WireGuard runs in kernel space and adds ~3ms of latency.
What It Is
| Protocol | WireGuard (kernel-space VPN) |
| Purpose | Encrypted remote access to your network |
| Platform | Linux server + any client (iOS, Android, Windows, macOS) |
| License | GPL v2 |
| Repository | wireguard.com |
Why WireGuard Over OpenVPN/IPSec
- WireGuard
- ~4,000 lines of code (auditable)
- OpenVPN
- ~100,000 lines of code
- IPSec
- ~400,000 lines of code (many implementations)
- Performance (iperf3)
- WireGuard
- 95% of native speed (~3ms overhead)
- OpenVPN
- 60-80% of native speed (~10-15ms overhead)
- IPSec
- 70-85% of native speed (~8-12ms overhead)
- Handshake
- ~1ms (WireGuard) vs ~500ms (OpenVPN)
- Roaming
- Built-in (WireGuard) vs Manual (OpenVPN)
The Core Problem: Remote Access Without the Risk
| Scenario | Problem | WireGuard Solution |
|---|---|---|
| Coffee shop Wi-Fi | All traffic visible to network owner | Full tunnel encrypts everything |
| Traveling | Can't access homelab services | Split tunnel reaches internal IPs |
| Remote work | Need office network access | Site-to-site tunnel connects offices |
| Mobile device | Cellular data monitored by ISP | Full tunnel hides all traffic |
- Full Tunnel
- Split Tunnel
Step 0 — Server Requirements
| Component | Minimum |
|---|---|
| Server | Ubuntu 22.04+ (any cloud VPS or homelab box) |
| RAM | 256 MB (WireGuard is very lightweight) |
| CPU | 1 core |
| Bandwidth | Depends on usage (1 Mbps per connected client minimum) |
| Public IP | Required for server (or use Dynamic DNS) |
Step 1 — Install WireGuard
On Ubuntu Server
sudo apt update
sudo apt install wireguard wireguard-tools -y

# Verify
wg --version
# wireguard-tools v1.0.20210914
Enable IP Forwarding
# Enable IPv4 forwarding
echo "net.ipv4.ip_forward=1" | sudo tee -a /etc/sysctl.conf
sudo sysctl -p

# Verify
sysctl net.ipv4.ip_forward
# net.ipv4.ip_forward = 1
Step 2 — Generate Server Keys
# Generate server private key
wg genkey | sudo tee /etc/wireguard/server_private.key
sudo chmod 600 /etc/wireguard/server_private.key

# Derive public key
sudo cat /etc/wireguard/server_private.key | wg pubkey | sudo tee /etc/wireguard/server_public.key

# Display keys
echo "Server Private Key: $(sudo cat /etc/wireguard/server_private.key)"
echo "Server Public Key: $(sudo cat /etc/wireguard/server_public.key)"
Step 3 — Server Configuration
/etc/wireguard/wg0.conf
[Interface]
# Server settings
Address = 10.0.0.1/24
ListenPort = 51820
PrivateKey = <SERVER_PRIVATE_KEY>

# Firewall rules (run on interface up)
PostUp = iptables -A FORWARD -i wg0 -j ACCEPT; iptables -t nat -A POSTROUTING -o eth0 -j MASQUERADE
PostDown = iptables -D FORWARD -i wg0 -j ACCEPT; iptables -t nat -D POSTROUTING -o eth0 -j MASQUERADE

# Optional: DNS for clients
# DNS = 1.1.1.1, 8.8.8.8

# --- Client 1 (Phone) ---
[Peer]
PublicKey = <CLIENT1_PUBLIC_KEY>
AllowedIPs = 10.0.0.2/32

# --- Client 2 (Laptop) ---
[Peer]
PublicKey = <CLIENT2_PUBLIC_KEY>
AllowedIPs = 10.0.0.3/32
Start WireGuard
sudo wg-quick up wg0

# Enable on boot
sudo systemctl enable wg-quick@wg0

# Check status
sudo wg show
# interface: wg0
#   public key: <key>
#   private key: (hidden)
#   listening port: 51820
Step 4 — Client Configuration
Generate Client Keys
# Client 1 (Phone)
wg genkey | tee client1_private.key | wg pubkey > client1_public.key

# Client 2 (Laptop)
wg genkey | tee client2_private.key | wg pubkey > client2_public.key
Client Config — Full Tunnel
All traffic routes through the VPN (secure on public Wi-Fi):
[Interface]
PrivateKey = <CLIENT_PRIVATE_KEY>
Address = 10.0.0.2/24
DNS = 1.1.1.1, 8.8.8.8

[Peer]
PublicKey = <SERVER_PUBLIC_KEY>
Endpoint = YOUR_SERVER_IP:51820
AllowedIPs = 0.0.0.0/0, ::/0
PersistentKeepalive = 25
Client Config — Split Tunnel
Only internal traffic routes through VPN (faster for general browsing):
[Interface]
PrivateKey = <CLIENT_PRIVATE_KEY>
Address = 10.0.0.2/24
DNS = 192.168.40.1  # Your Pi-hole

[Peer]
PublicKey = <SERVER_PUBLIC_KEY>
Endpoint = YOUR_SERVER_IP:51820
AllowedIPs = 10.0.0.0/24, 192.168.0.0/16
PersistentKeepalive = 25
QR Code for Mobile
# Install qrencode
sudo apt install qrencode -y

# Generate QR code
qrencode -t ansiutf8 < client1_full.conf
# Or save as image
qrencode -o client1.png < client1_full.conf
Step 5 — Firewall Rules
# Allow WireGuard port
sudo ufw allow 51820/udp

# Allow WireGuard traffic
sudo ufw allow in on wg0

# Allow SSH (don't lock yourself out)
sudo ufw allow ssh

# Enable UFW
sudo ufw enable
sudo ufw status
iptables (Alternative)
# Allow WireGuard port
iptables -A INPUT -p udp --dport 51820 -j ACCEPT

# Allow forwarded traffic through wg0
iptables -A FORWARD -i wg0 -j ACCEPT
iptables -A FORWARD -o wg0 -j ACCEPT

# NAT for internet access through VPN
iptables -t nat -A POSTROUTING -o eth0 -j MASQUERADE
Step 6 — Mobile Setup
iOS/Android
- Install WireGuard from App Store / Play Store
- Open app → Add Tunnel → Scan QR Code
- Scan the QR code generated in Step 4
- Toggle VPN on
Windows/macOS
- Download from wireguard.com/install
- Import
.conffile - Activate tunnel
Step 7 — Site-to-Site Tunnel
Connect two networks over WireGuard:
Site A (Home)
[Interface]
Address = 10.0.0.1/24
PrivateKey = <SITE_A_PRIVATE_KEY>
ListenPort = 51820

[Peer]
PublicKey = <SITE_B_PUBLIC_KEY>
Endpoint = SITE_B_IP:51820
AllowedIPs = 10.0.0.0/24, 192.168.20.0/24  # Site B's networks
PersistentKeepalive = 25
Site B (Office)
[Interface]
Address = 10.0.0.2/24
PrivateKey = <SITE_B_PRIVATE_KEY>
ListenPort = 51820

[Peer]
PublicKey = <SITE_A_PUBLIC_KEY>
Endpoint = SITE_A_IP:51820
AllowedIPs = 10.0.0.0/24, 192.168.10.0/24  # Site A's networks
PersistentKeepalive = 25
Step 8 — Dynamic DNS (Optional)
If your home IP changes:
# Install ddclient
sudo apt install ddclient -y

# Configure /etc/ddclient.conf
protocol=cloudflare
use=web
login=your@email.com
password=your_api_token
server=api.cloudflare.com
zone=yourdomain.com
yourdomain.com
What I'd Tell Anyone Building One
-
Full tunnel for public Wi-Fi, split tunnel for home. When you're at a coffee shop, route everything through your VPN — the network owner can't see your traffic. When you're at home, only route internal traffic — you don't want your Netflix going through your home server in another country.
-
WireGuard is UDP, not TCP. This matters because TCP-over-TCP causes performance problems (retransmit storms). WireGuard's UDP transport avoids this entirely. If UDP is blocked, considerOutline or Cloudflare WARP as alternatives.
-
PersistentKeepalive = 25is critical. Without it, the VPN tunnel drops when there's no traffic for ~2 minutes (NAT timeout). The keepalive packet every 25 seconds keeps the connection alive. -
Use
AllowedIPsto control routing.0.0.0.0/0routes everything (full tunnel).10.0.0.0/24, 192.168.0.0/16routes only internal networks (split tunnel). This is the single most important setting in the client config. -
Generate a QR code for mobile. Typing 512-bit keys on a phone is error-prone.
qrencode -t ansiutf8 < client.confproduces a scannable QR code that the WireGuard app imports in 2 seconds. -
Firewall rule: never forget SSH. Before enabling UFW, always
sudo ufw allow ssh. Locking yourself out of a remote server is a rite of passage — avoid it.
Get It
- WireGuard: wireguard.com
- Installation: wireguard.com/install
- Quick Start: wireguard.com/quickstart
- Architecture: wireguard.com/protocol
Last updated: 2026-09-01 — Tested on Ubuntu 24.04 LTS with WireGuard kernel module, iOS/Android clients, site-to-site tunnels.