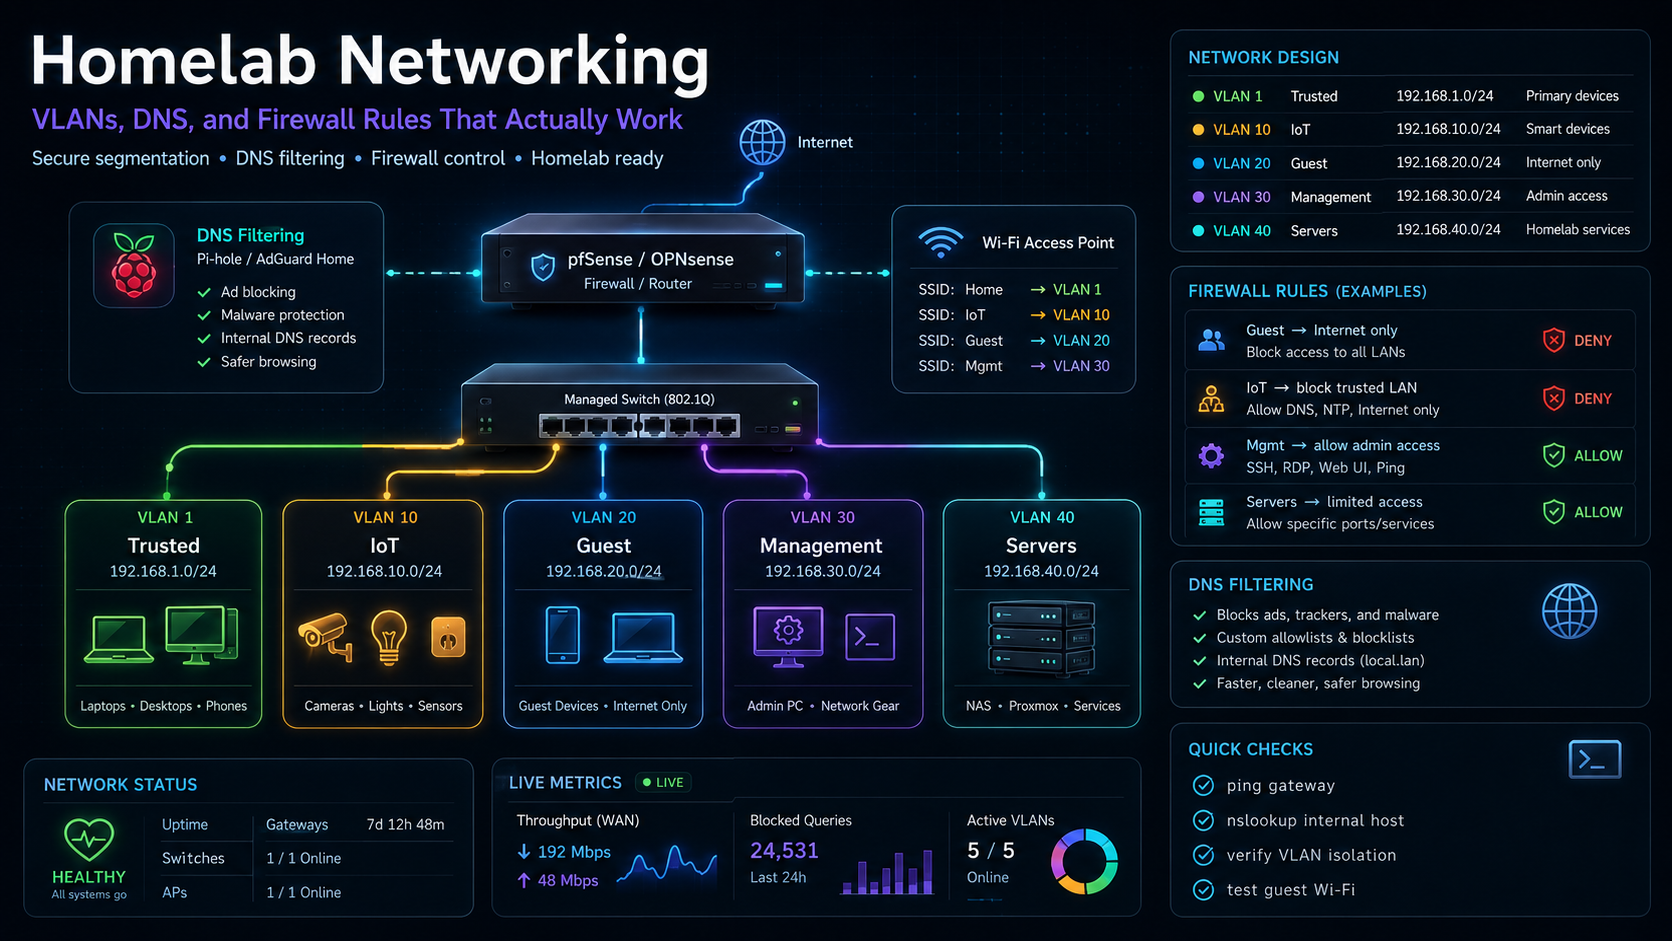
Homelab Networking — VLANs, DNS, and Firewall Rules That Actually Work
A homelab without proper networking is just a pile of servers on a flat network where your IoT cameras can talk to your database and your guest Wi-Fi can reach your admin panel. That's not a lab — it's a liability.
I segmented my homelab into VLANs for trusted devices, IoT, guest access, and management traffic — with DNS that resolves internal services, firewall rules that enforce isolation, and Pi-hole filtering the whole network. This guide walks through building a network that's secure, fast, and doesn't require a $2000 enterprise switch.
What It Is
| Components | VLANs + DNS (Pi-hole/AdGuard Home) + Firewall (pfSense/OPNsense/Ubiquiti) |
| Purpose | Network segmentation, DNS filtering, and access control |
| Hardware | Managed switch + router/firewall + AP |
| Budget | $200–$800 (depending on hardware choices) |
| Topology | Single-router with VLAN trunking to a managed switch |
Network Design
| VLAN | Name | Subnet | Purpose |
|---|---|---|---|
| 1 | Trusted | 192.168.1.0/24 | Laptops, phones, workstations |
| 10 | IoT | 192.168.10.0/24 | Smart home devices, cameras |
| 20 | Guest | 192.168.20.0/24 | Guest Wi-Fi, visitors |
| 30 | Management | 192.168.30.0/24 | Switches, APs, router admin |
| 40 | Servers | 192.168.40.0/24 | Homelab servers, NAS, VMs |
The Core Problem: Flat Networks Are Dangerous
A flat network (everything on one subnet) means:
- Any device can reach any other. Your $15 smart plug can scan your database server
- No traffic filtering. A compromised IoT device becomes a pivot point into your entire network
- No DNS control. Devices phone home to ad servers, tracking endpoints, and malware C2 servers
- No performance isolation. A camera streaming 40 Mbps of video saturates your workstation's bandwidth
VLANs solve the segmentation problem. DNS filtering solves the privacy problem. Firewall rules solve the isolation problem.
- Flat Network
- VLAN-Segmented Network
- VLAN 1 (Trusted)
- 192.168.1.0/24
- VLAN 10 (IoT)
- 192.168.10.0/24
- VLAN 20 (Guest)
- 192.168.20.0/24
- VLAN 30 (Mgmt)
- 192.168.30.0/24
- VLAN 40 (Servers)
- 192.168.40.0/24
Step 0 — Hardware
Minimum Stack
| Component | Recommended | Budget Option |
|---|---|---|
| Router/Firewall | Ubiquiti USG or pfSense box | TP-Link ER605 |
| Managed Switch | Ubiquiti USW-Lite-16-PoE | TP-Link TL-SG108E |
| Access Point | Ubiquiti U6 Lite | TP-Link EAP245 |
| DNS | Pi-hole on Raspberry Pi or Docker | Pi-hole in VM |
Why Managed Switch?
An unmanaged switch treats all ports the same — no VLAN support. A managed switch lets you: - Tag ports with VLAN IDs - Create VLAN trunks (carry multiple VLANs on one cable) - Set port-based access control
Step 1 — Router/Firewall (pfSense or OPNsense)
Install pfSense
- Download ISO from pfsense.org
- Flash to USB, boot, install to hard drive
- Assign interfaces: WAN (Internet), LAN (Trusted VLAN)
Create VLANs on the Router
Interfaces → Assignments → VLANs
| Parent Interface | VLAN Tag | Description |
|---|---|---|
| em0 (LAN) | 10 | IoT |
| em0 (LAN) | 20 | Guest |
| em0 (LAN) | 30 | Management |
| em0 (LAN) | 40 | Servers |
Assign VLAN Interfaces
Interfaces → Assignments
| Interface | Name | IPv4 Address |
|---|---|---|
| VLAN 10 | IoT | 192.168.10.1/24 |
| VLAN 20 | Guest | 192.168.20.1/24 |
| VLAN 30 | Management | 192.168.30.1/24 |
| VLAN 40 | Servers | 192.168.40.1/24 |
Firewall Rules
Firewall → Rules → VLAN 10 (IoT)
| Action | Source | Destination | Port | Description |
|---|---|---|---|---|
| Allow | IoT net | DNS server | 53 | DNS resolution |
| Allow | IoT net | Internet | 80, 443 | HTTP/HTTPS |
| Block | IoT net | RFC1918 | * | Block IoT from reaching internal networks |
| Block | IoT net | * | * | Block all else |
Firewall → Rules → VLAN 20 (Guest)
| Action | Source | Destination | Port | Description |
|---|---|---|---|---|
| Allow | Guest net | DNS server | 53 | DNS resolution |
| Allow | Guest net | Internet | 80, 443 | HTTP/HTTPS only |
| Block | Guest net | RFC1918 | * | No internal access |
| Block | Guest net | * | * | Block all else |
Firewall → Rules → VLAN 40 (Servers)
| Action | Source | Destination | Port | Description |
|---|---|---|---|---|
| Allow | Servers net | Any | * | Full access (trusted) |
| Allow | Trusted net | Servers net | * | Trusted can reach servers |
| Block | IoT net | Servers net | * | IoT cannot reach servers |
| Block | Guest net | Servers net | * | Guest cannot reach servers |
Step 2 — Managed Switch Configuration
Create VLANs on the Switch
Switch Settings → VLANs
| VLAN ID | Name |
|---|---|
| 1 | Trusted (default) |
| 10 | IoT |
| 20 | Guest |
| 30 | Management |
| 40 | Servers |
Port Assignment
| Port | Mode | VLANs | Device |
|---|---|---|---|
| 1 | Trunk | 1, 10, 20, 30, 40 | Router (uplink) |
| 2–4 | Access | 1 (Trusted) | Workstations |
| 5–6 | Access | 10 (IoT) | Smart plugs, cameras |
| 7 | Access | 20 (Guest) | Guest AP |
| 8 | Access | 30 (Mgmt) | AP management |
| 9–12 | Access | 40 (Servers) | NAS, Proxmox, servers |
Trunk Port (Port 1 to Router)
The trunk port carries all VLANs between the switch and router:
Port 1: Mode=Trunk, PVID=1, Tagged=10,20,30,40
Step 3 — Pi-hole (DNS Filtering)
Install Pi-hole
# On a Raspberry Pi or Docker host
curl -sSL https://install.pi-hole.net | bash

# Or with Docker
docker run -d \
  --name pihole \
  -p 53:53/tcp -p 53:53/udp \
  -p 8053:80 \
  -e TZ=America/New_York \
  -e WEBPASSWORD=your_admin_password \
  -v pihole:/etc/pihole \
  --restart unless-stopped \
  pihole/pihole:latest
Configure Pi-hole
- Open
http://PIHOLE_IP/admin - Settings → DNS:
- Upstream DNS: Cloudflare (1.1.1.1) + Google (8.8.8.8)
- Enable conditional forwarding for local domains
Block Lists
Add these block lists:
| List | URL | Purpose |
|---|---|---|
| Steven Black's | https://raw.githubusercontent.com/StevenBlack/hosts/master/hosts |
Ads + malware |
| Oisd | https://big.oisd.nl/domainswild |
Comprehensive blocking |
| oNonPi | https://hole.nozaki.me/uantiplists/antip lists/combined_light.txt |
Privacy |
DNS Records for Internal Services
Local DNS → DNS Records
| Domain | IP | Purpose |
|---|---|---|
nas.local |
192.168.40.10 | TrueNAS |
proxmox.local |
192.168.40.20 | Proxmox |
homeassistant.local |
192.168.10.50 | Home Assistant |
pihole.local |
192.168.30.53 | Pi-hole admin |
Step 4 — Inter-VLAN Routing Rules
Default Rules
| From | To | Allow | Block |
|---|---|---|---|
| Trusted | All | Everything | — |
| IoT | DNS, Internet | 53, 80, 443 | All RFC1918 |
| Guest | DNS, Internet | 53, 80, 443 | All RFC1918 |
| Management | Trusted, Servers | SSH, HTTP(S) | — |
| Servers | Trusted | Everything | — |
| Servers | IoT, Guest | Nothing | All |
Specific Use Cases
| Scenario | Rule |
|---|---|
| IoT camera → NAS (recording) | Allow IoT:192.168.10.30 → Servers:192.168.40.10:554 (RTSP) |
| Guest → Printer | Block Guest → Trusted (no printer access) |
| Proxmox → Internet | Allow Servers → Internet (updates) |
| IoT → Home Assistant | Allow IoT:192.168.10.0/24 → IoT:192.168.10.50:8123 |
Step 5 — Wireless Configuration
SSID → VLAN Mapping
| SSID | VLAN | Password | Purpose |
|---|---|---|---|
HomeWiFi |
1 (Trusted) | Strong WPA3 | Family devices |
HomeWiFi_IoT |
10 (IoT) | Strong WPA2 | Smart home devices |
HomeWiFi_Guest |
20 (Guest) | Simple WPA2 | Guests |
Ubiquiti AP Config
Settings → WiFi → Create New Network

Network: HomeWiFi
VLAN: 1 (or untagged for default)
Security: WPA3-Personal

Network: HomeWiFi_IoT
VLAN: 10
Security: WPA2-Personal

Network: HomeWiFi_Guest
VLAN: 20
Security: WPA2-Personal
Guest Hotspot: Enabled
Step 6 — Verification
Test VLAN Isolation
# From Trusted VLAN (192.168.1.x):
ping 192.168.10.1    # Should work (router)
ping 192.168.10.30   # Should fail (IoT blocked)
ping 192.168.40.10   # Should work (NAS)

# From IoT VLAN (192.168.10.x):
ping 192.168.1.1     # Should fail (Trusted blocked)
ping 192.168.1.10    # Should fail (workstation blocked)
ping 8.8.8.8         # Should work (Internet)
Test DNS Filtering
# From any device:
nslookup ads.google.com
# Should return 0.0.0.0 (blocked)

nslookup google.com
# Should return real IP (allowed)

nslookup nas.local
# Should return 192.168.40.10 (local DNS)
What I'd Tell Anyone Building One
-
Start with VLANs, not firewalls. VLANs give you 80% of the security benefit with 20% of the complexity. A managed switch and router with VLAN support is enough — you can add firewall rules later.
-
Block IoT from the start. Every IoT device is a potential attack vector. Put them on a separate VLAN and block all RFC1918 traffic. If they need to reach a specific internal service, add a single allow rule.
-
Pi-hole is the best $0 investment. It blocks ads, trackers, and malware domains for every device on your network. No client-side software needed — just point DNS to Pi-hole.
-
Use conditional forwarding for local domains. Without it, Pi-hole can't resolve
nas.localbecause it forwards to Cloudflare. Enable Settings → DNS → "Use conditional forwarding" and point to your router's IP. -
Don't over-segment. Four VLANs (Trusted, IoT, Guest, Servers) covers 99% of homelab needs. More VLANs mean more firewall rules to manage and more things that can break.
-
Label your ports. When you're debugging connectivity at 11 PM, you don't want to trace cables. Use a label maker or colored cables to identify VLANs.
Get It
- pfSense: pfsense.org
- OPNsense: opnsense.org
- Pi-hole: pi-hole.net
- AdGuard Home: adguard.com/adguard-home
- Ubiquiti: ui.com
Last updated: 2026-09-01 — Tested with Ubiquiti USG + USW-Lite-16-PoE + U6 Lite, Pi-hole v6, pfSense 2.7.