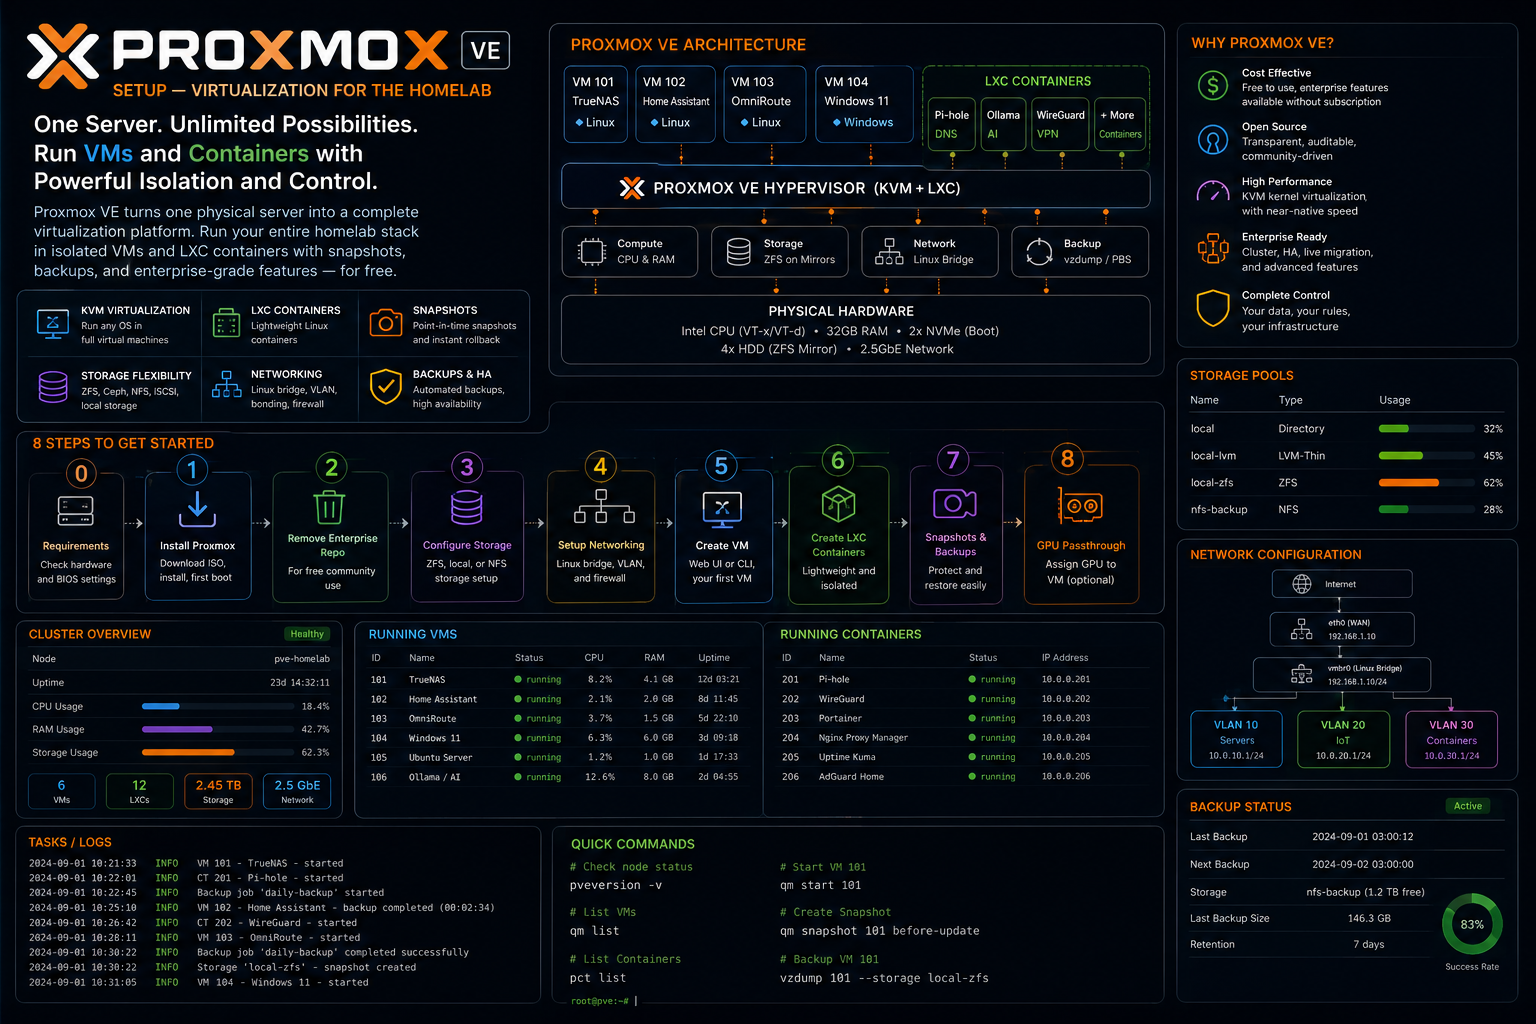
Proxmox VE Setup — Virtualization for the Homelab
Running everything on bare metal means one failed hard drive takes down your NAS, your media server, your VPN, and your home automation — all at once. Proxmox VE turns one physical server into an isolated VM and container platform where each service runs in its own sandbox.
I run Proxmox VE 8 on a mini PC with six VMs and a dozen LXC containers — TrueNAS, Home Assistant, Pi-hole, OmniRoute, Ollama, and this blog — all on a single box with automated snapshots and backups. This guide walks through installation, storage, networking, and creating your first VMs and containers.
What It Is
| Platform | Proxmox VE 8 (Debian-based hypervisor) |
| Purpose | Type-1 virtualization for VMs and containers |
| License | Free (enterprise repo optional) |
| Hypervisor | KVM (VMs) + LXC (containers) |
| Web UI | https://YOUR_SERVER_IP:8006 |
| Repository | proxmox.com |
What You Get
| Feature | Details |
|---|---|
| VM Support | Full KVM virtualization (any OS) |
| Container Support | LXC containers (Linux, lightweight) |
| Web Interface | Browser-based management |
| Snapshots | Point-in-time VM snapshots, instant rollback |
| Backups | Built-in backup to local/remote storage |
| HA (Cluster) | High availability across multiple nodes |
| Live Migration | Move running VMs between physical hosts |
| Storage | ZFS, Ceph, NFS, iSCSI, local |
The Core Problem: Bare Metal Is Fragile
| Scenario | Bare Metal | Proxmox |
|---|---|---|
| App update breaks service | Manual rollback | Snapshot rollback in 30 seconds |
| Hard drive failure | Everything down | VM restored from backup |
| Need to test software | Risk production | Spin up isolated VM |
| Resource waste | Dedicated server per app | Share hardware efficiently |
| Migration to new hardware | Full reinstall | Export/import VM |
- Hypervisor
- KVM (Kernel-based Virtual Machine)
- Containers
- LXC (Linux Containers)
- Storage
- ZFS on mirrors (recommended)
- Networking
- Linux bridge (vmbr0) or OVS
- Backup
- vzdump (built-in, Proxmox Backup Server optional)
Step 0 — Hardware Requirements
Minimum
| Component | Minimum | Recommended |
|---|---|---|
| CPU | 4 cores (Intel VT-x/AMD-V) | 8+ cores with AES-NI |
| RAM | 8 GB | 32–64 GB |
| Boot Drive | 128 GB SSD | 256 GB NVMe |
| Storage | 1 TB HDD | 4+ TB (ZFS mirrors) |
| Network | 1 GbE | 2.5/10 GbE |
| NIC | Intel I210/I225 | Intel X710 (for SR-IOV) |
BIOS Settings
Enable these in BIOS/UEFI before installing:
| Setting | Value |
|---|---|
| Intel VT-x | Enabled |
| Intel VT-d | Enabled (for GPU passthrough) |
| AES-NI | Enabled |
| Secure Boot | Disabled (Proxmox doesn't sign kernels) |
| Wake-on-LAN | Enabled (optional) |
Step 1 — Installation
Download and Flash
- Download Proxmox VE ISO from proxmox.com/en/downloads
- Flash to USB:
dd if=proxmox-ve_8.2-1.iso of=/dev/sdX bs=1M status=progress - Boot from USB
Install Process
- Select Install Proxmox VE (Graphical)
- Accept EULA
- Select target disk (install to SSD/NVMe)
- Set country, timezone, keyboard
- Set root password and email
- Set hostname (e.g.,
proxmox.home.local) - Set management IP (static recommended)
- Click Install
After First Boot
Access web UI at https://YOUR_SERVER_IP:8006
Login with root / your password.
Step 2 — Remove Enterprise Repo (Free Use)
Proxmox enables the enterprise repo by default, which shows warnings without a subscription. Disable it:
# SSH into Proxmox
ssh root@YOUR_SERVER_IP

# Disable enterprise repo
sed -i 's/^deb/# deb/' /etc/apt/sources.list.d/pve-enterprise.list

# Add no-subscription repo
echo "deb http://download.proxmox.com/debian/pve bookworm pve-no-subscription" > /etc/apt/sources.list.d/pve-no-subscription.list

# Update
apt update && apt upgrade -y
Step 3 — Storage Configuration
Local Storage (ZFS)
# Check available disks
lsblk

# Create ZFS pool (mirror = RAID 1)
zpool create -o ashift=12 \
  tank mirror /dev/sda /dev/sdb

# Create datasets
zfs create tank/vm-disks
zfs create tank/container-rootfs
zfs create tank/backups
zfs create tank/images

# Verify
zpool status
zfs list
Add Storage to Proxmox
Datacenter → Storage → Add → ZFS
| Field | Value |
|---|---|
| Name | tank |
| ZFS Pool | tank |
| Content | Disk images, ISO images, VZDump backup file |
NFS Backup (Optional)
# On your NAS/NFS server
# Export /backup to Proxmox IP
echo "/backup 192.168.40.20(rw,sync,no_subtree_check)" >> /etc/exports
exportfs -ra
Datacenter → Storage → Add → NFS
| Field | Value |
|---|---|
| Name | nfs-backup |
| Server | 192.168.40.10 |
| Export | /backup |
| Content | VZDump backup file |
Step 4 — Networking
Linux Bridge (Default)
# /etc/network/interfaces
auto vmbr0
iface vmbr0 inet static
    address 192.168.40.20/24
    gateway 192.168.40.1
    bridge-ports eno1
    bridge-stp off
    bridge-fd 0
VLAN-Aware Bridge
# For VLAN-segmented VMs
auto vmbr0
iface vmbr0 inet static
    address 192.168.40.20/24
    gateway 192.168.40.1
    bridge-ports eno1
    bridge-stp off
    bridge-fd 0
    bridge-vlan-aware yes
    bridge-vids 1 10 20 30 40
VM Network with VLAN
VM Network Config:
Model: VirtIO (paravirtualized)
Bridge: vmbr0
VLAN Tag: 40 (Servers)
Rate Limit: 1000 (Mbps, optional)
Step 5 — Create Your First VM
Web UI Method
- Create VM (top right button)
- General:
- Name:
truenas - OS: ISO image (upload TrueNAS ISO)
- System: BIOS = OVMF (UEFI), SCSI Controller = VirtIO SCSI
- Disk: 32 GB on
tank:vm-disks, Discard + SSD Emulation - CPU: 4 cores, Type = host
- Memory: 8192 MB (8 GB)
- Network: VirtIO, Bridge = vmbr0, VLAN = 40
- Start and open console
Command Line Method
# Create VM with qm
qm create 100 \
  --name truenas \
  --memory 8192 \
  --cores 4 \
  --cpu host \
  --scsihw virtio-scsi-pci \
  --scsi0 tank/vm-disks/vm-100-disk-0,size=32G \
  --ide2 local:iso/truenas.iso,media=cdrom \
  --net0 virtio,bridge=vmbr0,tag=40 \
  --ostype l26 \
  --bios ovmf \
  --machine q35

qm start 100
Step 6 — LXC Containers
LXC containers share the host kernel — they're faster and lighter than VMs.
Create LXC Container
Create CT (Web UI button)
| Field | Value |
|---|---|
| Hostname | pihole |
| Template | debian-12-standard |
| Password | (set) |
| Disk | 8 GB |
| CPU | 2 cores |
| Memory | 512 MB swap, 1024 MB RAM |
| Network | Bridge = vmbr0, VLAN = 30 |
Command Line
pct create 200 \
  local:vztmpl/debian-12-standard_12.7-1_amd64.tar.zst \
  --hostname pihole \
  --password your_password \
  --rootfs local-lvm:8 \
  --cores 2 \
  --memory 1024 \
  --swap 512 \
  --net0 name=eth0,bridge=vmbr0,tag=30,hwaddr=auto
Manage Containers
pct start 200          # Start
pct stop 200           # Stop
pct reboot 200         # Reboot
pct enter 200          # Shell access
pct exec 200 -- bash   # Execute command
Step 7 — Snapshots and Backups
Snapshots
# Take snapshot
qm snapshot 100 pre-update

# List snapshots
qm listsnapshot 100

# Restore snapshot
qm rollback 100 pre-update
Automated Backups
Datacenter → Backup → Add
| Field | Value |
|---|---|
| Storage | tank/backups |
| Schedule | Daily at 3:00 AM |
| Selection | All VMs |
| Mode | Snapshot |
| Compression | ZSTD |
| Retention | Keep last 7 |
Manual Backup
# Backup specific VM
vzdump 100 --storage tank/backups --compress zstd

# Backup all VMs
vzdump --all --storage tank/backups --compress zstd
Step 8 — GPU Passthrough (Optional)
For running Ollama, Plex transcoding, or gaming VMs:
# Enable IOMMU (Intel)
echo "intel_iommu=on iommu=pt" >> /etc/default/grub
update-grub
reboot

# Verify IOMMU groups
find /sys/kernel/iommu_groups/ -type l | sort

# Bind GPU to vfio-pci
echo "vfio-pci" > /etc/modules
echo "options vfio-pci ids=10de:2684,10de:22ba" >> /etc/modprobe.d/vfio.conf
update-initramfs -u
reboot
Assign GPU to VM
qm set 100 --hostpci0 0000:01:00,pcie=1,x-vga=1
What I'd Tell Anyone Building One
-
Start with LXC containers, not VMs. LXC shares the host kernel and uses 1/10th the resources. Use VMs only when you need a different OS or full hardware isolation. Most homelab services (Pi-hole, Home Assistant, databases) run perfectly in containers.
-
ZFS mirrors, not RAID 5. RAID 5 rebuild times on large drives are terrifying — a 20 TB drive can take 24+ hours to rebuild, during which another failure kills your data. ZFS mirrors (2-drive RAID 1) rebuild in minutes and give you Copy-on-Write integrity checks.
-
Snapshot before every change. One
qm snapshotbefore an update takes 2 seconds and saves you from a broken VM. Rollback takes 30 seconds. There's no reason not to snapshot. -
Use
hostCPU type. Setting CPU type tohostpasses through all host CPU features (AVX, AES-NI, etc.) to the VM. Defaultkvm64disables these and hurts performance. -
VirtIO everything. Use VirtIO network cards, VirtIO SCSI controllers, and VirtIO disk drivers. They're paravirtualized and dramatically faster than emulated hardware.
-
Separate boot and data drives. Put Proxmox on a small NVMe boot drive. Put VM disks on separate storage (ZFS pool, NFS, or Ceph). If the boot drive fails, your VMs survive.
Get It
- Proxmox VE: proxmox.com
- Proxmox Wiki: pve.proxmox.com/wiki
- Proxmox Forums: forum.proxmox.com
- Backup Server: proxmox.com/en/proxmox-backup-server
Last updated: 2026-09-01 — Tested on Proxmox VE 8.2 with ZFS mirrors, LXC containers, and KVM VMs.